Azure Networking: Connecting Cloud Resources is your guide to understanding the fundamental concepts and benefits of Azure networking. In this article, we will explore how Azure provides a reliable and secure infrastructure for connecting your cloud resources. From virtual networks to hybrid connectivity options, you will discover the tools and services that enable seamless connectivity and communication within the Azure ecosystem. Whether you are new to Azure or looking to enhance your networking skills, this article serves as a friendly introduction to the world of Azure networking. Get ready to navigate the cloud with confidence!
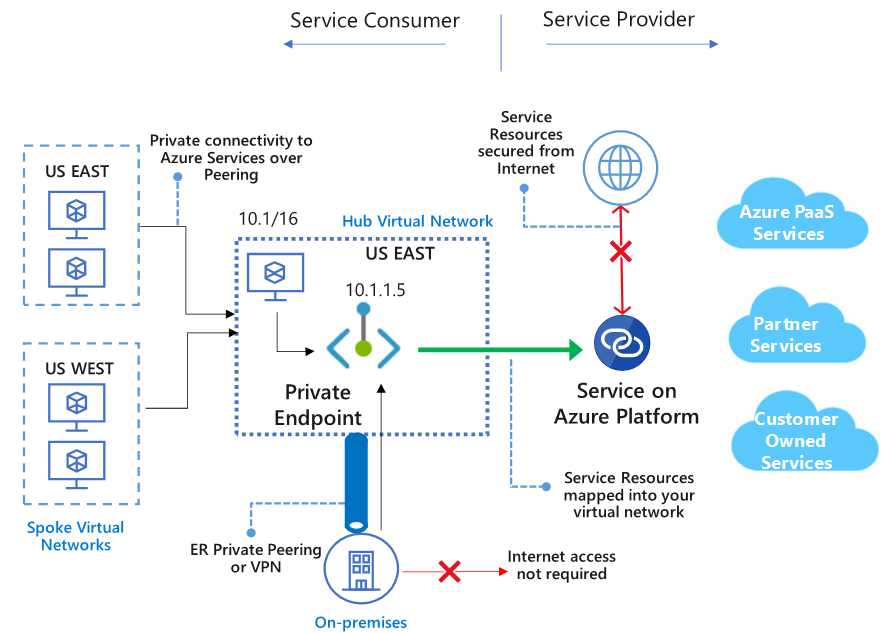
Azure Networking Overview
Azure Networking is a crucial aspect of Microsoft Azure, as it helps connect cloud resources, enabling organizations to build and manage their virtual networks within the Azure ecosystem. With Azure Networking, you can seamlessly connect your virtual machines, Azure services, and on-premises resources securely and efficiently.
What is Azure Networking?
Azure Networking refers to a set of services and tools provided by Microsoft Azure that facilitate the connectivity of cloud resources. It allows organizations to create, configure, and manage virtual networks, subnets, gateways, load balancers, and more. By leveraging Azure Networking, businesses can establish secure and reliable connections between their on-premises infrastructure and Azure resources.
Importance of Azure Networking
Azure Networking plays a vital role in enabling businesses to maximize the benefits of cloud computing. By leveraging Azure Networking services, organizations can achieve the following key advantages:
-
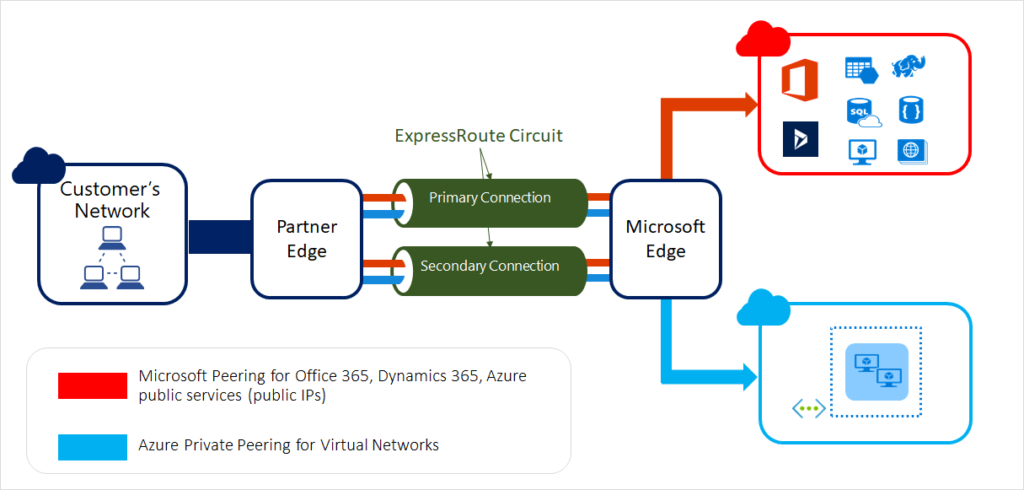
Connectivity and Integration: Azure Networking provides a seamless and secure way to connect and integrate on-premises infrastructure with Azure resources. Whether it’s establishing a virtual private network (VPN) or utilizing Azure ExpressRoute, organizations can ensure smooth communication and data exchange between their on-premises environment and the Azure cloud.
-
Scalability and Flexibility: Azure Networking allows businesses to scale their network infrastructure as per their requirements. With the ability to create and configure virtual networks, subnets, and gateways, organizations can easily adapt their network architecture to accommodate changing workloads and business needs.
-
Security and Compliance: Azure Networking ensures that data transfer between on-premises infrastructure and Azure resources is secure and compliant. By leveraging features such as virtual network service endpoints and network security groups (NSGs), businesses can enforce strict access controls and protect their network from unauthorized access.
-
High Availability and Reliability: Azure Networking provides various load balancing and traffic management capabilities, such as load balancers and application gateways, to ensure high availability and reliable connectivity to Azure resources. This helps organizations achieve minimal downtime and enhance the performance of their services hosted on Azure.
Benefits of Azure Networking
Azure Networking offers a wide range of benefits that enable organizations to enhance their network infrastructure and leverage the power of cloud computing. Here are some key benefits:
-
Global Reach: Azure Networking spans across several regions, allowing businesses to deploy their resources closer to their users and customers. This ensures low latency, improved performance, and a better user experience.
-
Layered Security: Azure Networking provides multiple layers of security to safeguard your network infrastructure and data. From built-in firewall capabilities to threat detection and prevention, Azure Networking offers robust security features to protect against cyber threats.
-
Cost Optimization: By using Azure Networking services, organizations can optimize their network infrastructure and reduce costs. With features such as virtual network peering and traffic routing with Traffic Manager, businesses can efficiently distribute network traffic and ensure cost-effective resource utilization.
-
Integration with Azure Services: Azure Networking seamlessly integrates with other Azure services, such as Azure Virtual Machines, Azure App Service, and Azure Kubernetes Service. This enables businesses to create comprehensive and fully integrated cloud solutions.
Now that we have a good overview of Azure Networking, let’s delve into the specific components and services that form the foundation of Azure Networking.
Virtual Network (VNet)
What is VNet?
A Virtual Network (VNet) in Azure is a logical representation of a private network in the cloud. It allows businesses to securely connect and isolate their Azure resources, providing a virtual network boundary for their cloud infrastructure. When you create a VNet, you can choose the IP address ranges, subnets, and other network configurations that meet your specific requirements.
Purpose of VNet
The purpose of a VNet is to provide an isolated and secure networking environment for resources deployed within Azure. By creating a VNet, organizations can define their own private IP address space, subnets, and network security rules. Additionally, a VNet enables communication between different Azure resources, such as virtual machines, while keeping them separate from other resources.
Components of VNet
A VNet consists of several key components that work together to establish and manage the network infrastructure. These components include:
-
Address Space: This defines the range of IP addresses that will be used within the VNet. The IP address space can be divided into multiple subnets to provide more granular control over network traffic.
-
Subnets: Subnets are used to segment the VNet into smaller logical networks. By dividing the VNet into subnets, organizations can control network traffic flows, apply security policies, and ensure that resources are properly isolated.
-
Network Security Groups (NSGs): NSGs are virtual firewalls that allow organizations to control inbound and outbound network traffic to and from the resources within a subnet or VNet. NSGs help enforce network security policies and protect the VNet from unauthorized access.
-
Virtual Network Gateway: The Virtual Network Gateway provides connectivity between a VNet and on-premises networks or other VNet resources. It enables the establishment of site-to-site VPNs and allows for secure communication between on-premises infrastructure and Azure resources.
These components work together to create a secure, isolated, and well-connected network environment within Azure. With a solid understanding of VNet, let’s explore another important element of Azure Networking – Subnets.
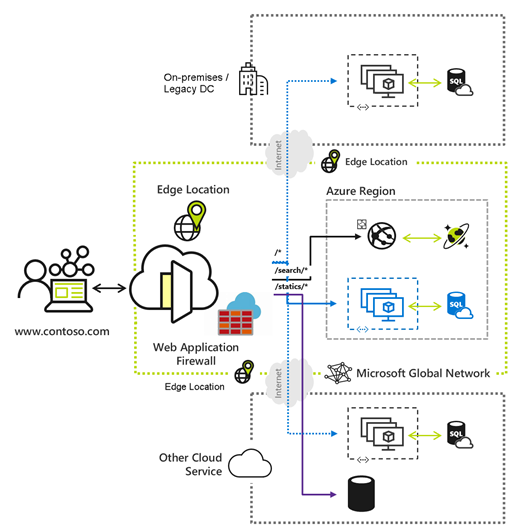
Subnets
What are Subnets?
Subnets are a key component of a Virtual Network (VNet) in Azure. They enable the segregation of different resources within the VNet and allow for more granular control over network traffic. A subnet is a range of IP addresses within a VNet that can be used to assign to resources such as virtual machines.
Subnet Creation and Configuration
To create a subnet within a VNet, you need to define the subnet’s IP address range and other configuration settings. When creating subnets, it is important to consider the following:
-
IP Address Range: Each subnet within a VNet must have a unique IP address range within the VNet’s address space. It is crucial to plan the IP address range allocation carefully to ensure proper IP address utilization.
-
Network Security Groups: By associating a subnet with a Network Security Group (NSG), you can control inbound and outbound traffic to and from the resources within the subnet. NSGs allow you to define security rules and enforce network traffic policies at the subnet level.
-
Connectivity: Subnets within a VNet can be connected to other subnets within the same VNet or to other VNets using VNet peering or Virtual Network Gateway.
By properly configuring subnets and defining network security rules, organizations can achieve better network segmentation and control over their Azure resources.
Subnet Peering
Subnet peering is a feature of Azure Networking that allows you to connect two or more subnets in different VNets within the same region. With subnet peering, resources in different subnets can communicate with each other directly, without the need for gateways or additional network appliances.
By leveraging subnet peering, businesses can achieve the following benefits:
-
Low Latency: Subnet peering enables direct communication between subnets, resulting in low latency and improved network performance.
-
Simplified Network Architecture: With subnet peering, organizations can simplify their network architecture by eliminating the need for additional gateways or complex routing configurations.
-
Transitive Peering: Subnet peering supports transitive peering, which means that if VNet A is peered with VNet B, and VNet B is peered with VNet C, then VNet A and VNet C can communicate with each other through the transitive peering relationship.
Subnet peering significantly enhances network connectivity and simplifies network architecture within Azure. With the ability to establish secure and direct communication between subnets, organizations can achieve efficient resource utilization and seamless network integration.
Virtual Network Gateway
What is a Virtual Network Gateway?
A Virtual Network Gateway is a network appliance provided by Azure that serves as a gateway or connector between an Azure Virtual Network (VNet) and on-premises networks or other VNets. It enables secure and reliable connectivity and allows businesses to establish site-to-site VPNs or point-to-site VPNs.
Types of Virtual Network Gateways
Azure provides two types of Virtual Network Gateways:
-
VPN Gateway: A VPN Gateway is used to establish secure and encrypted connections between a VNet and on-premises networks or other VNets over the internet. It allows for secure communication without the need for physical hardware.
-
ExpressRoute Gateway: An ExpressRoute Gateway is used to establish dedicated and private connections between a VNet and on-premises infrastructure or other VNets. It provides a more reliable and higher bandwidth connection compared to a VPN Gateway.
Configuring a Virtual Network Gateway
Configuring a Virtual Network Gateway involves the following steps:
-
Create Gateway Subnet: Before creating a Virtual Network Gateway, you need to create a subnet within the VNet exclusively for the gateway. This subnet will be used to host the Virtual Network Gateway.
-
Create Virtual Network Gateway: After creating the gateway subnet, you can create a Virtual Network Gateway. During the creation process, you will need to specify the deployment model, VPN type (VPN Gateway or ExpressRoute Gateway), and other necessary configuration settings.
-
Connect the Gateway: Once the Virtual Network Gateway is created, you can configure the necessary connections to establish secure connectivity between the VNet and on-premises infrastructure or other VNets. This involves configuring the appropriate connection types, such as site-to-site VPN or point-to-site VPN.
By leveraging Virtual Network Gateways, organizations can establish secure and reliable connections between their Azure resources and on-premises networks or other Azure VNets. With different gateway types available, businesses can choose the appropriate solution based on their connectivity requirements.
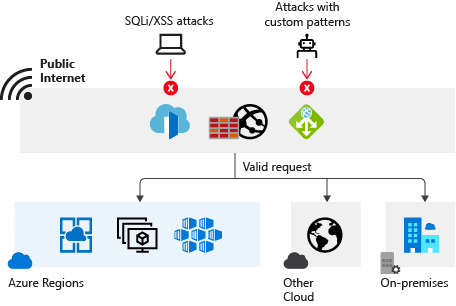
Virtual Network Service Endpoints
What are Virtual Network Service Endpoints?
Virtual Network Service Endpoints provide a secure way to access specific Azure services through virtual network interfaces. They allow businesses to extend the security and access control capabilities of their virtual network to Azure services.
When a service endpoint is enabled for a subnet, the traffic destined for the specified Azure service is routed through the virtual network, eliminating the need to connect to the service over the public internet. This improves the security posture and performance of accessing Azure services.
Advantages of using Service Endpoints
Enabling Virtual Network Service Endpoints offers several advantages:
-
Improved Security: By routing traffic through the virtual network, service endpoints provide an additional layer of security. Access to the specified Azure service is limited to resources within the virtual network, reducing the exposure to potential attacks from public internet connections.
-
Reduced Egress Costs: Service endpoints reduce egress costs as outbound traffic to the Azure service stays within the virtual network. This eliminates the need for the traffic to travel over the public internet, saving on data transfer costs.
-
Optimized Performance: By accessing Azure services through service endpoints, network latency is reduced as the traffic does not need to traverse the public internet. This results in improved performance and a better user experience.
Configuring Service Endpoints
To configure Virtual Network Service Endpoints, you need to follow these steps:
-
Enable Service Endpoint on Subnet: Identify the Azure service for which you want to enable a service endpoint and configure it on the desired subnet within your virtual network. This ensures that traffic intended for the Azure service is routed through the virtual network.
-
Configure Service Access Policies: Service Access Policies allow you to control which resources within the virtual network are allowed to access the Azure service through the service endpoint. You can define granular access controls based on IP address ranges or specific resources.
By properly configuring service endpoints, organizations can enhance the security, performance, and cost efficiency of accessing Azure services. It provides a secure and optimized way to connect to Azure services without exposing them directly to the public internet.
Network Security Groups (NSGs)
What are NSGs?
Network Security Groups (NSGs) are Azure resources that allow businesses to define inbound and outbound network traffic rules for resources within a Virtual Network (VNet) or subnet. NSGs act as virtual firewalls, controlling access to resources and protecting them from unauthorized traffic.
Implementing NSGs to control traffic
NSGs provide granular control over network traffic by allowing you to define security rules based on various criteria such as source IP address, destination IP address, port, and protocol. By implementing NSGs, organizations can achieve the following:
-
Traffic Filtering: NSGs allow you to filter inbound and outbound traffic to and from resources within a VNet or subnet. You can define rules to allow or deny specific traffic based on predefined criteria.
-
Application Security: With NSGs, you can define rules to restrict access to specific ports or protocols. This helps protect your applications and services from unauthorized access and potential security threats.
-
Network Segmentation: By applying NSGs at the subnet or VNet level, you can segregate different resources and control the flow of traffic between them. This enhances network segmentation and helps enforce security policies.
NSG rules and rule priority
NSGs are composed of security rules that define how network traffic is allowed or denied. Each rule consists of the following elements:
- Name: A descriptive name for the security rule.
- Priority: A value that determines the order of evaluation of the security rules. Lower values take precedence over higher ones.
- Source and Destination: The IP address ranges, service tags, or application security groups that define the source and destination of network traffic.
- Port and Protocol: The port number and transport protocol (TCP, UDP, or Any) to which the rule applies.
- Action: The action to be taken on network traffic that matches the rule. It can be either “Allow” or “Deny”.
The priority of the rules is crucial in determining the order of evaluation. When multiple rules are matched for a specific traffic flow, the rule with the lowest priority takes precedence. It is important to plan the priority of the rules carefully to ensure that traffic is allowed or denied according to your intended security policies.
By implementing NSGs and properly configuring security rules, organizations can enforce network security policies, control traffic flows, and protect their Azure resources from unauthorized access or malicious activities.
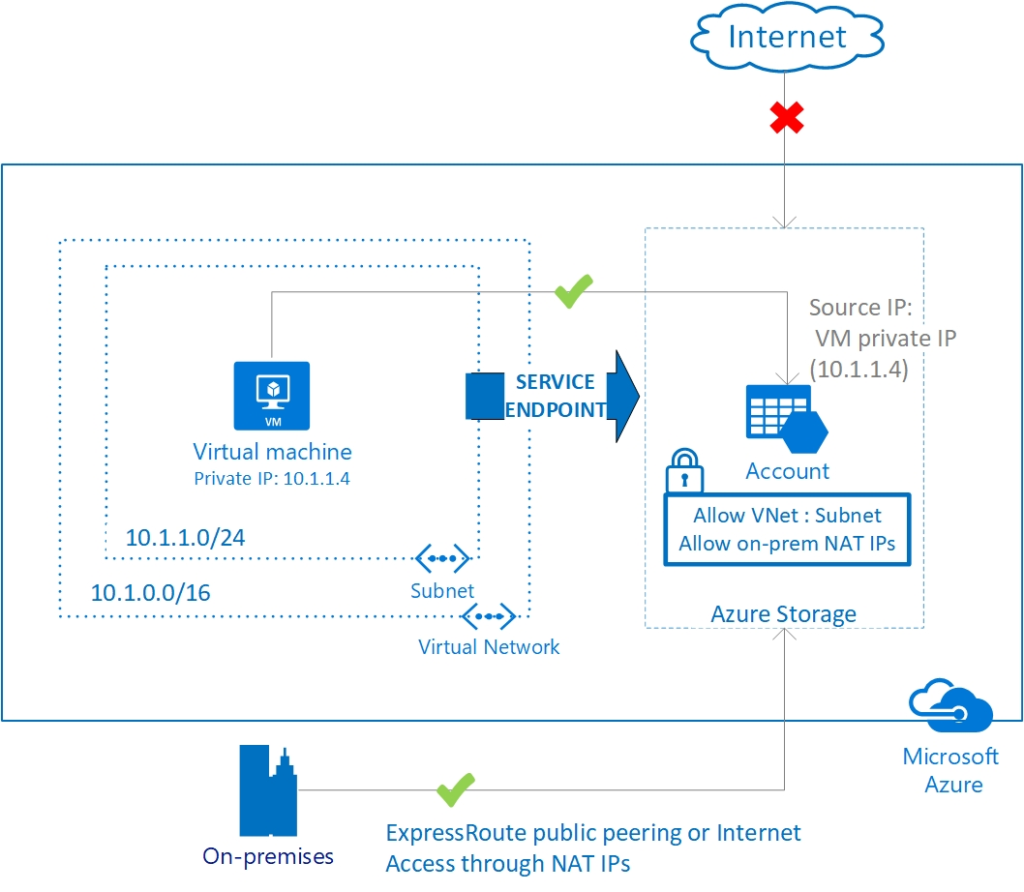
Load Balancer
What is a Load Balancer?
A Load Balancer is a networking resource in Azure that distributes incoming network traffic across multiple backend resources, such as virtual machines or virtual machine scale sets, to ensure high availability and maximize performance. It acts as a traffic manager, efficiently distributing network requests to backend resources based on predefined load balancing rules.
Types of Load Balancers in Azure
Azure provides two types of Load Balancers:
-
Public Load Balancer: A Public Load Balancer distributes incoming traffic from the internet to resources within a VNet or across multiple VNets. It allows businesses to provide publicly accessible services with high availability and scalability.
-
Internal Load Balancer: An Internal Load Balancer is used for distributing traffic within a VNet or across multiple VNets, but it is not directly accessible from the internet. Internal Load Balancers are typically used for internal-only services or backend services that are not exposed publicly.
Configuring Load Balancer
Configuring a Load Balancer involves the following steps:
-
Create Backend Resources: Before creating a Load Balancer, you need to have backend resources available, such as virtual machines or virtual machine scale sets, to distribute the traffic to. These backend resources should be configured to serve the desired application or service.
-
Create Load Balancer: After creating the backend resources, you can create a Load Balancer. During the creation process, you will need to define various configurations such as load balancing rules, backend pools, probes, and public or internal IP addresses.
-
Configure Load Balancer Rules: Load Balancer rules define how incoming traffic should be distributed to backend resources. You can configure rules based on protocol, port, and other parameters. Load Balancer provides different load balancing algorithms, such as round-robin or source IP affinity, to ensure even distribution of traffic.
By using Load Balancers, organizations can achieve high availability, fault tolerance, and scalability for their services or applications hosted on Azure. Load Balancers distribute incoming traffic intelligently, ensuring that backend resources are utilized efficiently and providing a seamless user experience.
Application Gateway
What is an Application Gateway?
An Application Gateway is a web traffic load balancer in Azure that provides advanced delivery controller features for application layer (HTTP/HTTPS) traffic. It acts as a reverse proxy, allowing businesses to manage and distribute traffic to multiple backend servers based on various routing rules.
Features of Application Gateway
Application Gateway offers several features that enhance the performance, security, and scalability of web applications:
-
SSL/TLS Termination: Application Gateway can terminate SSL/TLS encryption, offloading the SSL/TLS encryption and decryption workload from the backend servers. This improves the performance of the backend servers and simplifies the certificate management process.
-
Web Application Firewall (WAF): Application Gateway includes a built-in WAF that provides protection against common web vulnerabilities, such as SQL injection and cross-site scripting (XSS). The WAF helps safeguard web applications from malicious attacks.
-
Session Affinity: Application Gateway supports session affinity, also known as sticky sessions, to ensure that subsequent requests from a user session are routed to the same backend server. This is beneficial for applications that require maintaining user session state.
-
URL Routing and Redirection: Application Gateway allows you to define URL-based routing and redirection rules. This enables businesses to route traffic to different backend pools based on specific URL paths or redirect requests to different URLs.
Configuring Application Gateway
To configure an Application Gateway, follow these steps:
-
Create Backend Servers: Before creating an Application Gateway, you need to have backend servers or virtual machines hosting your web applications. These servers should be configured to serve the desired web applications.
-
Create Application Gateway: After creating the backend servers, you can create an Application Gateway. During the creation process, you will need to specify various configurations such as listeners, backend pools, routing rules, and SSL/TLS settings.
-
Configure Routing Rules: Application Gateway allows you to define routing rules based on URL paths, host headers, or other criteria. You can specify which backend pool should handle the incoming request based on the routing rules.
-
Enable Web Application Firewall (WAF): If needed, you can enable the built-in WAF to protect your web applications. The WAF offers a range of security features and can be configured with custom rule sets to meet specific security requirements.
By utilizing Azure Application Gateway, organizations can enhance the performance, security, and scalability of their web applications. Application Gateway offers advanced features that optimize web traffic and improve the user experience, making it suitable for various scenarios, such as e-commerce websites, content delivery networks, and microservices-based architectures.
Traffic Manager
What is Traffic Manager?
Traffic Manager is a networking service in Azure that provides load balancing and traffic management capabilities at the DNS level. It enables businesses to distribute incoming network traffic across multiple Azure resources, such as virtual machines or web applications, based on predefined routing policies.
Benefits of using Traffic Manager
By utilizing Traffic Manager, organizations can achieve several benefits:
-
High Availability: Traffic Manager allows businesses to achieve higher availability for their services by distributing traffic across multiple endpoints. If one endpoint becomes unavailable, Traffic Manager automatically directs traffic to other available endpoints.
-
Global Load Balancing: Traffic Manager can distribute traffic across multiple endpoints located in different Azure regions or even across hybrid cloud environments. This enables organizations to create geo-redundant architectures to serve users or customers from different locations.
-
Traffic Routing Policies: Traffic Manager provides various routing policies that determine how traffic is routed to endpoints. It supports policies such as Priority, Weighted, Performance, Geographic, and Multi-value, allowing flexibility in routing decisions based on specific requirements.
Configuring Traffic Manager
To configure Traffic Manager, follow these steps:
-
Create Endpoint Resources: Before setting up Traffic Manager, you need to have the endpoint resources, such as Azure VMs or web applications, available and configured to serve the desired services.
-
Create Traffic Manager Profile: After configuring the endpoint resources, you can create a Traffic Manager profile. During the creation process, you will need to define the routing policy, endpoint monitoring settings, and other necessary configurations.
-
Configure Traffic Manager Endpoints: Associate the endpoint resources with the Traffic Manager profile. You can specify the weight, priority, or performance value for each endpoint, depending on the routing policy selected.
-
Configure DNS Settings: To direct traffic to the Traffic Manager profile, you need to configure the DNS settings for your domain. Traffic Manager provides a unique DNS name (endpoint), which you can use as the entry point for your services.
By leveraging Traffic Manager, organizations can achieve efficient load balancing and traffic management for their services or applications deployed on Azure. Traffic Manager improves availability, provides scalability, and enhances the user experience by effectively routing network traffic based on predefined policies.
VPN Gateway
What is a VPN Gateway?
A VPN Gateway in Azure enables secure connectivity between a Virtual Network (VNet) in Azure and on-premises networks. It allows organizations to establish site-to-site VPN tunnels or point-to-site VPN connections, ensuring secure and encrypted communication between Azure resources and on-premises infrastructure.
Configuring Site-to-Site VPN
Configuring a Site-to-Site VPN involves the following steps:
-
Create VPN Gateway: Before setting up a Site-to-Site VPN, you need to create a VPN Gateway in Azure. During the creation process, you will need to specify the gateway type, VPN device IP address, and other necessary configurations.
-
Configure Local Network Gateway: To establish the VPN connection, you need to create a Local Network Gateway, which represents your on-premises network. You will need to provide the public IP address of your VPN device, the IP address ranges of your on-premises network, and other configuration details.
-
Configure Connection: After creating the VPN Gateway and Local Network Gateway, you can establish the connection between them. This involves specifying the shared key for authentication and configuring the connection settings.
-
Test and Verify Connection: Once the connection is established, you can test and verify the connectivity between the Azure VNet and the on-premises network. This includes verifying access to resources on both sides and troubleshooting any connectivity issues, if necessary.
Configuring Point-to-Site VPN
Configuring a Point-to-Site (P2S) VPN involves the following steps:
-
Create VPN Gateway: Similar to a Site-to-Site VPN, you need to create a VPN Gateway in Azure for a Point-to-Site VPN. During the creation process, you will need to specify the gateway type, client address pool, and authentication method.
-
Create and Install VPN Client Certificates: For each client that needs to connect to the Azure VNet, you need to generate a VPN client certificate. These certificates are used to authenticate the VPN clients during the connection process. The client certificates are then installed on the client machines.
-
Configure VPN Client: On the client machines, you need to install the VPN client software and provide the necessary connection details. This includes the public IP address of the VPN Gateway, the VPN client certificate, and any additional connection settings.
-
Test and Verify Connection: Once the VPN client is configured, you can test and verify the connection to the Azure VNet. This involves establishing the VPN connection and verifying access to resources in the VNet.
By configuring VPN Gateways and establishing secure VPN connections, organizations can securely connect their on-premises infrastructure with Azure resources. VPN Gateways provide encrypted communication channels, ensuring data privacy and integrity, and enabling seamless connectivity between on-premises networks and Azure VNets.
In conclusion, Azure Networking offers a comprehensive suite of services and tools that enable organizations to build, configure, and manage their network infrastructure within the Azure ecosystem. With features such as Virtual Networks, Subnets, Virtual Network Gateways, Load Balancers, and more, businesses can achieve secure and reliable connectivity between their on-premises infrastructure and Azure resources. By leveraging Azure Networking, organizations can enhance their network performance, security, scalability, and cost efficiency, empowering them to fully leverage the benefits of cloud computing.
